Lecture2 BS
Page 1.
|
I have given lectures on this subject for many years and I have also published what you are about to read in a number of places, including a few of my books. The difference this time around though is that there is an Appendix for British readers, detailing the British equivalents of the products I refer to in this lecture. This was compiled by Karl Bartoni several years ago, in advance of one of my lectures in Edinburgh, Scotland. How to turn a plain white photo-copy (Xerox) into a Priceless Antique. Over
the years I’ve found these products the best for this type of work:- To stain the white paper use Minwax penetrating stain 210BA Golden Oak and for the staining work you will need a few paint brushes, cheap ones will do fine. To protect the finished document and give it a soft lustre use Minwax Finishing Paste wax. To add color use Berol’s Prismacolor artist pencils. They come in a full range of colors. They work well because the lead is soft and the colors are blendable. They cost about $1.00 each and are well worth it. When your document has the look you want, before using the paste wax, seal your work with Krylon’s Crystal Clear Sealer. This will prevent the colors or ink from smearing when you wax it. For writing or drawing, I use a Sharpie Ultra Fine Point Pen with permanent ink. You will also need a supply of soft rags for buffing and polishing and a flat surface to work on. I use a large artist pad but five or six sheets of newspaper will also work. If you use newspaper, use old ones where the ink is dry. With
your tools at hand, you also need one or two Xerox copies of your
selected item. This could be anything (picture from a clipart book or an
old line drawn map etc.) as long as it is a black and white Xerox copy.
If you have printed the image out from your computer, you will still
need to have it Xeroxed because your printer ink will not stand up to
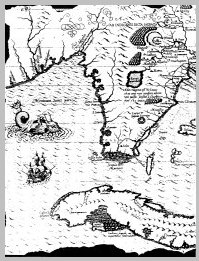
the treatment. One item I make up on a regular basis is that of an old map of Florida (shown below). It is used in one of my favourite routines, ‘The Fountain Of Youth’, which is fully detailed in my book, ‘The Papers Of Gautama’ and The Linking Ring (Vol.81, #3, March 2001, page 96).
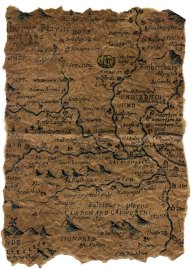
In the case of such a map, you want a very old appearance. With what it is supposed to have gone through you would not expect it to have clean straight edges, so the first thing to do is tear around the edges. Don’t try to be neat. Now crumble the map into a tight ball then open it out flat and put it on several layers of newspaper, print side down. Brush on the Golden Oak Stain. If you are making more than one you can put them on top of each other, all with the artwork face down. As each new top sheet is stained, remove it and place it on some other newspapers to dry. Continue until all sheets have been stained. Paper that has previously been crumbled takes a while longer to dry than paper that is flat. In either case, give them about an hour to dry properly. In the case of the map, where you want to show great age, think about what it should look like. Old documents that have been handled a lot show more wear on the edges. You can obtain this effect by re-staining the edges. You will want to leave a little more stain on the edges, so when you brush it on start your brush about an inch and a half from the edge and brush outward, raising the brush as you reach the edge. Once you have the look you want, put it aside to dry again. Once your map is dry you can add color. To heighten the look of the darker edges I use the color pencil Canary Yellow. Use the side of the lead, not the point and work out from the center. The center should be more intense and softened as it is worked towards the edges. Using a soft rag to buff and blend the color as you go along. Remember, such a map is very old and with age, any color that was originally on it is bound to have faded. Other colors can be used on the map. A light green to indicate foliage, pale blue for water and so on. Take it a step at a time, always buffing as you go along. When the map has the desired look it is time to seal it. This is done on the side with the map showing. Place it on some newspapers and holding the can of Krylon Crystal Clear Sealer at least 12 inches away from the surface, give it a light spray. It takes only a minute or two to dry. Buff it again, then spray again and buff when dry. To do a good job, I repeat the spraying three times. After the final spray and buffing you can seal it with the wax. This step is repeated twice on each side, buffing after each application. When you are finished the map will look old and the look is preserved, in fact it will be virtually waterproof. You may want to add some tears in the edge of the paper or even tear a hole in it. Play with it until you are satisfied. You can once again crumble the map tightly in a ball. When it is opened out you will see tiny cracks in the wax, a nice effect. You would now have the very map that Ponce de Leon carried with him when searching for The fountain Of Youth, a priceless document. That's all there is to it. Experiment, make a plain white paper turn into parchment or whatever you want. Below is an example of another map (Salisbury,England) transformed from a plain Xerox copy. Click on the picture for a larger view.
The same techniques apply to objects other than paper. Try it on stone, wood or fabrics. One warning, once you’ve played with this and seen what you can create, it becomes an addictive pastime. Maybe you should forget the whole thing and buy the finished products from Brother Shadow. Have fun for yourself and add a little more believability to your effects and story lines. To Read The Appendix CLICK HERE. To Continue This Lecture CLICK HERE. |
Back to the ARTS & CRAFTS INDEX.
| All the material in this lecture, on all pages, is copyrighted with all rights reserved to Carl Herron, 1997. |